MQTT - Unity interface
[!WARNING] This documentation is set to be partialy merged with the API documentation for Unity.
[!WARNING] This package does not allow for certificate validation.
Project owner: Yann van Eijk
Project description
This repository contains the scripts needed within Unity to create an interface between MQTT and Unity. Its main functionality is to receive and sent real-time messages from topics on the MQTT Broker. These messages are processed within Unity as strings, for other types use TryParse.
Installation
The MQTT package is part of the 'DT lab Unity interface package'. For a full installation guide, please refer to...
MQTT broker connections
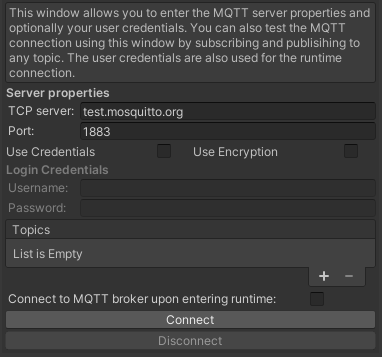
A connection to the MQTT broker can be established using the MQTT editor window. This window can be found under the header Tools -> EAISI Digital Twin Lab -> MQTT editor. A new window should pop up next to the Inspector window.

In this window, the following parameters need to be set:
| Variable | Type | Description | Optional/ Required |
|---|---|---|---|
| TCP server | String | Hostname or IP adress of MQTT Broker. | Required |
| Port | String | Port number of MQTT on broker. | Required |
| Use Credentials | Boolean | Some MQTT brokers require user credentials for connections. If this is the case for the broker you want to connect to, tick this box. | Optional (Check broker) |
| Use Encryption | Boolean | Some MQTT brokers require an encrypted connection. If this is the case for the broker you want to connect to, tick this box. | Optional (Check broker) |
| Username | String | Username of account set at MQTT broker. | Optional (see Use Credentials) |
| Password | String | Password of account set at MQTT broker. | Optional (see Use Credentials) |
| Topics | List<String> | List of topics to subscribe to. All subscription topics used in the Unity project should be declared here. | Optional (Required for subscription functionality) |
| Connect to MQTT broker at runtime | Boolean | Disables editor time connection and enables connection upon entering runtime. Only enable this setting after testing the connection in editor time. | Optional |
Upon the initial opening of the editor window, the TCP server and Port variables are already set. This allows the user to quickly check if a connection to test.mosquitto.org can be established. To test this, click the gray connect button on the bottom the MQTT editor window. In the console, a debugging message should pop up stating Connected to: test.mosquitto.org:1883. This indicates that the package is working as intended.
Workflow
- Setup MQTT broker. If you already have an account and password provided by the Digital Twin Lab or if you already setup your own broker, go to step 2. For certain projects it is possible to make use of the MQTT broker of the Digital Twin Lab. If you want to make use of the MQTT broker of the Digital Twin Lab, but dont have credentials yet, please contact us via e-mail.
- Open the
MQTT Editor WindowviaTools -> EAISI Digital Twin Lab -> MQTT editorin the Unity Editor. A new window should pop up next to theInspectorwindow. - You can test the library by clicking the
Connectbutton on the bottom of the MQTT editor window without changing any of the windows parameters. This only tests if the interface can connect to a MQTT broker, no messages are relayed. A message statingConnected to: test.mosquitto.org:1883should pop up in theConsolewindow within Unity. ClickingDisconnectdisconnects the Unity client from the MQTT broker, indicated but the messageDisconnected from: test.mosquitto.org:1883. - Now, the connection to the desired MQTT broker can be established. Make sure to execute step 1 of this workflow.
- Fill in the parameters in the MQTT editor window as described in MQTT broker connections according to the settings of your MQTT broker. Click
Connect, if no connection is established, an error message will pop up in the Console. I.e.SocketException: Could not resolve host 'test.mosquittofalse.org', indicating the wrong TCP adress. Any error concerning aMqttCommunicationTimedOutExceptionindicates either a wrong port, a wrong username, or a wrong passowrd.
